
Entrepreneurs have the flexibility to decide which optional aspects they want to spend their time on. For instance, crafting a distinctive tagline for your business or creating an advertisement for your product or service are all choices that may yield advantages. However, it’s important to note that these options are not universally recognized as guaranteed successes for every business.
On the other hand, there are essential steps that every business must undertake to remain competitive in today’s market. At the forefront is the necessity of having a business website, closely followed by the importance of establishing a social media presence, particularly a Facebook business page.
Close to three billion people check Facebook every month, which is why a business page has become table stakes for nearly every inbound marketing strategy. The Facebook statistics that matter most to businesses put roughly two billion of those users on the platform daily, so knowing how to create a Facebook business page correctly is a basic skill for any company that wants to be found.
A Facebook business page is not only for your Facebook audience, though. Facebook is now part of Meta, alongside Instagram and WhatsApp, so setting up your page also gives you the account structure you need to run Instagram profiles, Meta ad campaigns, and Messenger conversations from one place. That connection is what turns a single page into the foundation of a wider Facebook marketing program.
Key Takeaways
✅ You need a personal Facebook account to create a business page, but none of your personal details appear on the page itself.
✅ Your page name should match your business name exactly across every channel, because consistent naming helps search engines connect your website and your social profiles.
✅ Category selection is a discovery setting, not a formality. Facebook uses your first category to decide who sees your page and your posts.
✅ Profile photos work best at 360 x 360 pixels or larger and cover photos at 820 x 312 or larger, since Facebook crops and resizes automatically.
✅ Claiming a custom username replaces the random one Facebook assigns and makes your page findable at facebook.com/yourbusiness.
✅ Publishing the page is the halfway point. A page with no posts, no call-to-action button, and no promotion behind it will not get discovered on its own.
What Is a Facebook Business Page?
A Facebook business page is a specialized profile on the Facebook platform, designed exclusively for businesses, brands, organizations, and public figures. Customized for professional purposes, this platform offers businesses the opportunity to connect with their target audience, customers, and followers on Facebook.
Unlike personal profiles, business pages provide features tailored for commercial use, such as analytics, advertising tools, and the ability to create and promote events. Businesses can share updates, engage with their audience through comments and messages, and showcase products or services on their Facebook business page.
In contrast to the majority of personal pages, which typically connect with a limited circle of friends and family, business pages are created to showcase an organization to a broader audience.
Users on Facebook have the option to follow a business page to receive updates. Additionally, they can engage by commenting and liking posts, similar to interactions on personal pages.
To set up a Facebook business page, it’s necessary to have an existing Facebook personal account. However, your personal account details are not displayed on the business page.
Having a business page is a fundamental aspect of online marketing and social media strategy for many enterprises.
How to Create a Facebook Business Page
Your Facebook personal page acts as the gateway to the business domain. If you’ve been hesitant until now, it’s the right time to register. Initiating your business page through your personal account ensures you’re linked as the administrator.
Moreover, you have the option to add team members to the business page, and their personal accounts will be linked in a similar manner.
If you are wondering how to create a Facebook business page, you have come to the right place. Follow these steps to quickly set up and activate your Facebook business page.
#1. Log In to Facebook
If you haven’t yet created a personal Facebook account, it is necessary to set one up. Your personal details won’t be displayed on your business page. If you prefer to maintain a clear distinction between your professional and personal life, consider establishing a second personal account using your work email. You can then utilize this account to create your business account.
Once you’re logged in, navigate to the Facebook homepage.
#2. Navigate to Create a Page
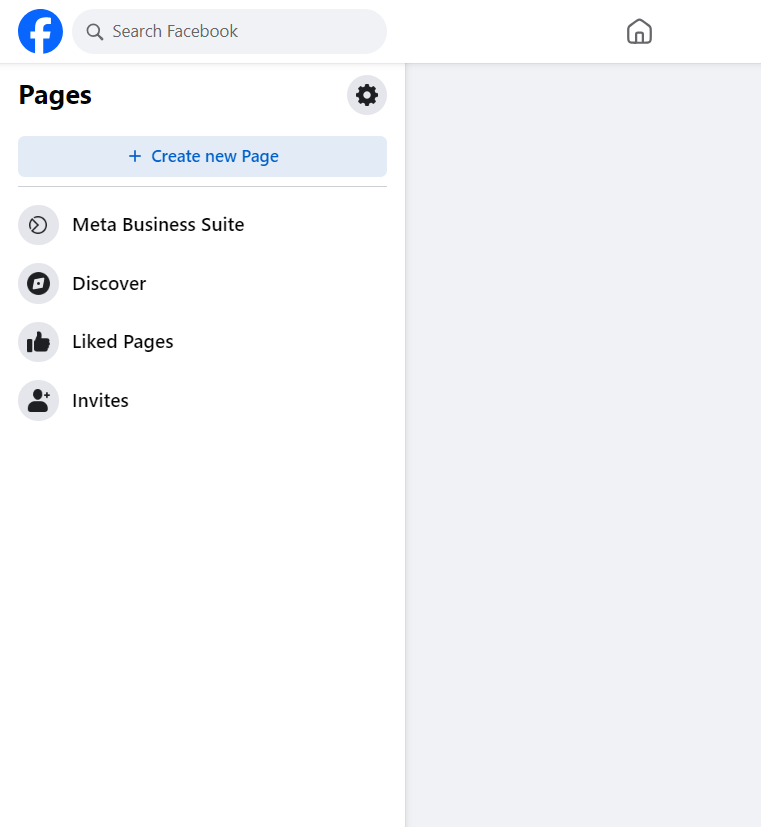
Navigate to the left-hand menu and select “Pages > Create New Page.” This action will initiate the “Page Creator” tool within your Facebook interface.
#3. Select a Page Type
You’ll be prompted to choose a type of page. Select “Business or Brand” if you’re creating a page for a company, brand, or organization. Choose “Community or Public Figure” if your page represents a public figure, group, or community cause.
#4. Fill in Basic Information
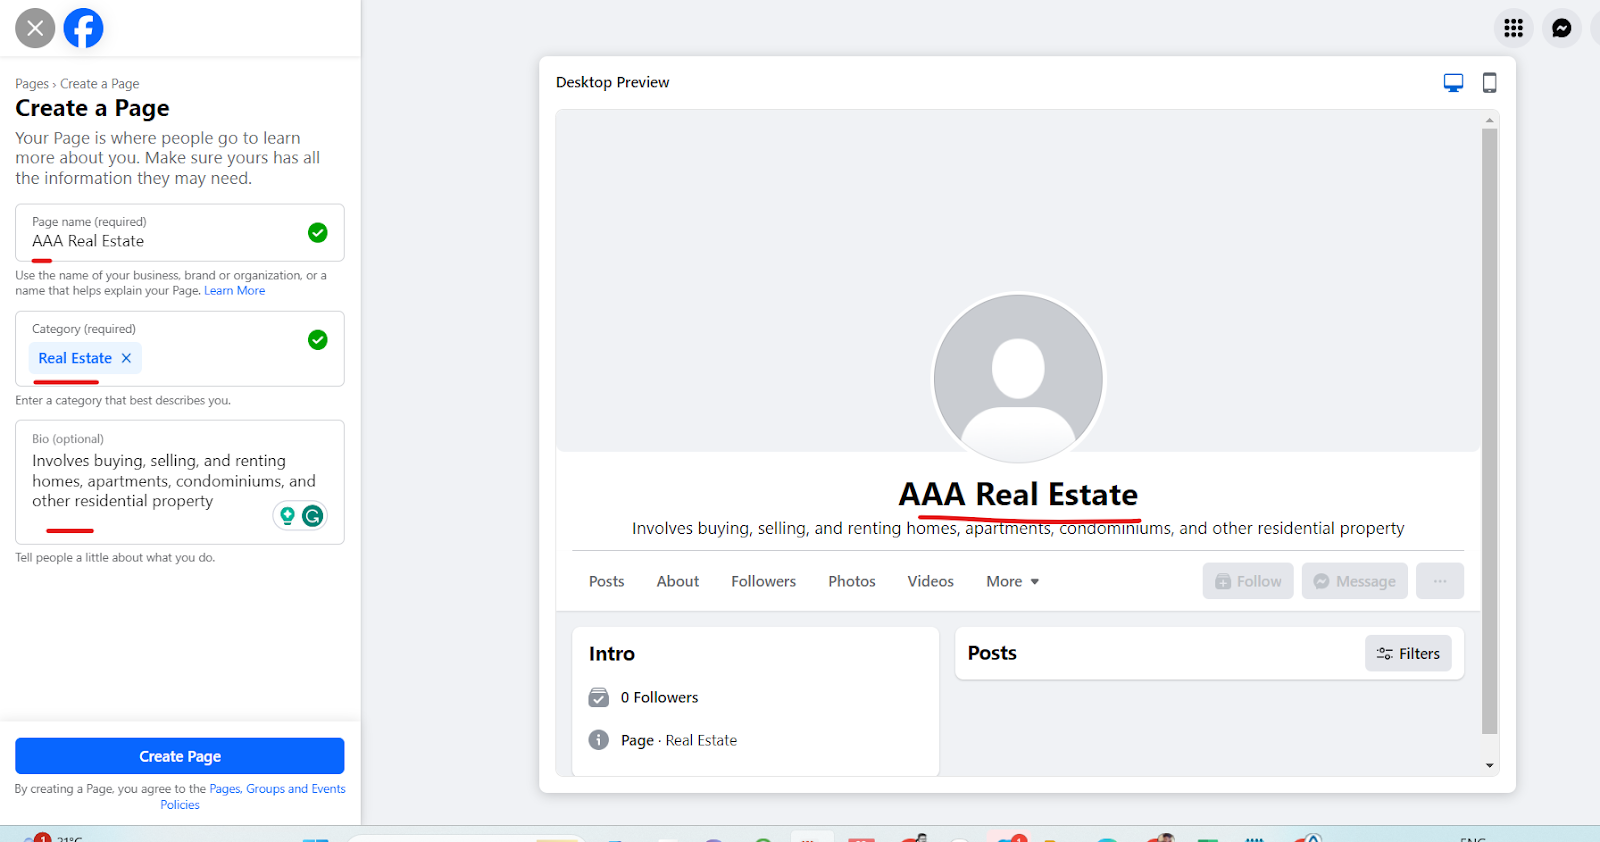
Enter the basic information for your business. This involves providing your business name and selecting the category that most accurately describes your business. Ensure the accuracy of this information as it reflects your brand identity.
At the top of the “Page Information” section, input your business name. Avoid using an alternative name, as the goal is to ensure perfect alignment with the name featured on your business website. This guarantees a seamless transition for your customers between the two platforms.
One Strategy to Connect All Your Marketing
My latest book helps small businesses, entrepreneurs, and marketers bring search, email, and social together into one digital marketing strategy that actually compounds.
Drawing on my work as a Fractional CMO, Digital Threads turns complicated tactics into a clear, practical plan you can follow, whatever your budget or team size.
Grab your copy on Amazon and start weaving your own digital threads. Click the cover or the button below to get started.

For SEO reasons, maintaining the exact same name across all channels is crucial. This practice ensures that search engines like Google can effortlessly link the various channels, thereby enhancing your authority and domain reputation.
When selecting a page name, consider the following:
- Your page name should precisely convey the page’s purpose, serving as your brand’s identity on Facebook. Choose thoughtfully, and in most instances, align the page name with your business or organization name.
- Avoid using a brand name owned by another company. Only official representatives of a brand have the authority to do so.
- Refrain from using titles in all capital letters, as this goes against Facebook guidelines.
#5. Choose Page Categories
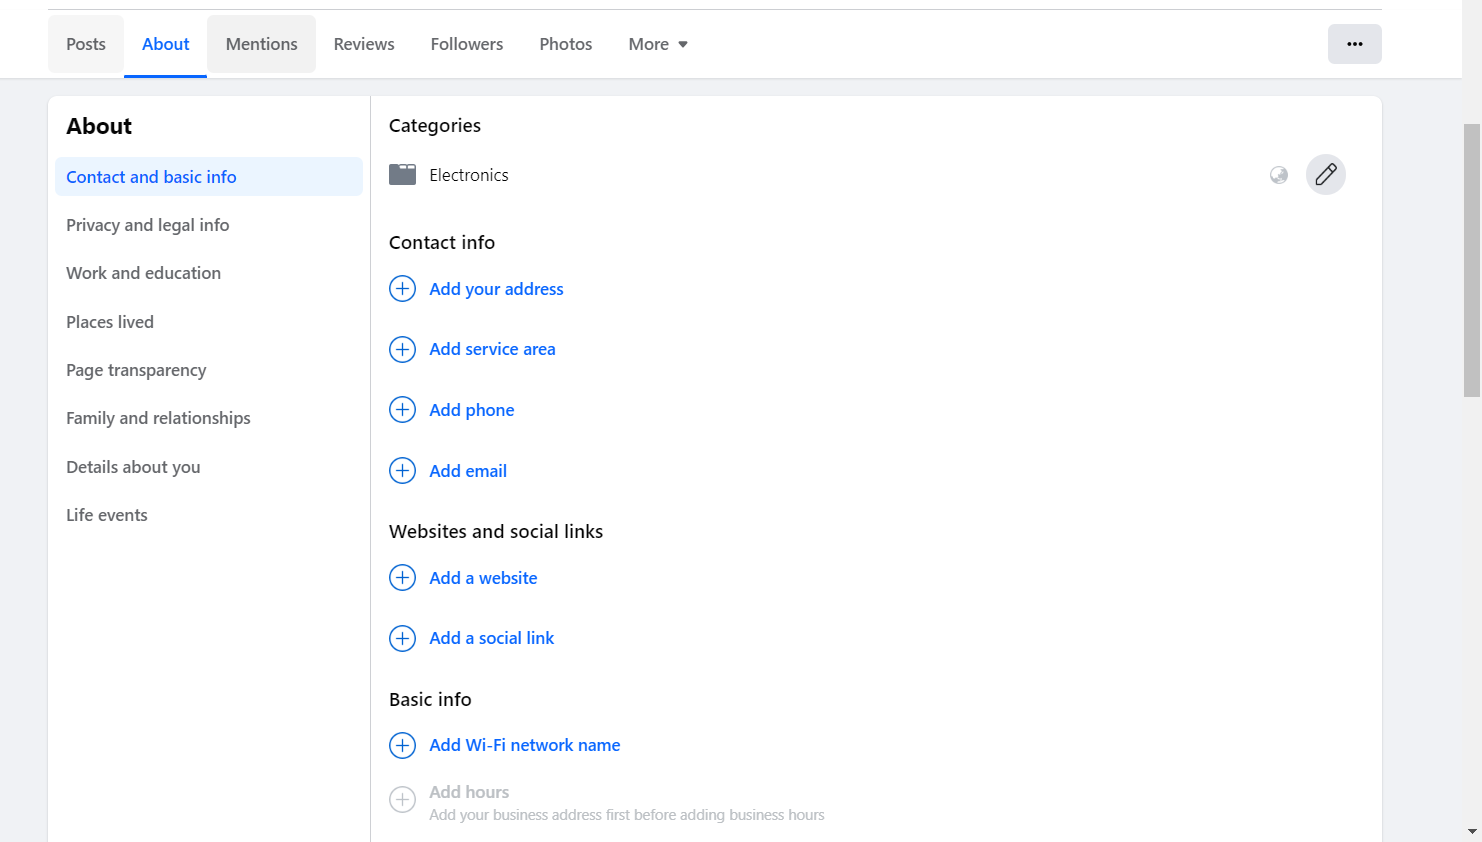
As you’re in the process of creating a business-focused page, it’s important to specify your type of business in the “Category” field. You need to select one or more categories, up to three, that best describe your business type or the primary theme of the page. Begin by typing words related to your business to explore the available categories.
Selecting a relevant category that holds significance in enhancing your Facebook visibility. Facebook utilizes this information to present your page and updates to an audience interested in topics related to your page’s categories.
The initial category you choose will be prominently displayed on your page, situated below the page name. So, you need to ensure that it accurately represents your content.
#6. Complete the “About” Section
Provide a brief description of your business in the “About” section in 255 characters or less. Communicate the nature of your business, such as your mission, the products or services you offer, and relevant contact details. This section gives visitors an overview of your business.
This page description is automatically displayed on the left sidebar when users visit your page. Write it as plain, readable text rather than styling it with special characters, and save any Facebook fonts generator experiments for posts where a little visual variety helps you stand out in the feed.
#7. Add Profile and Cover Photos
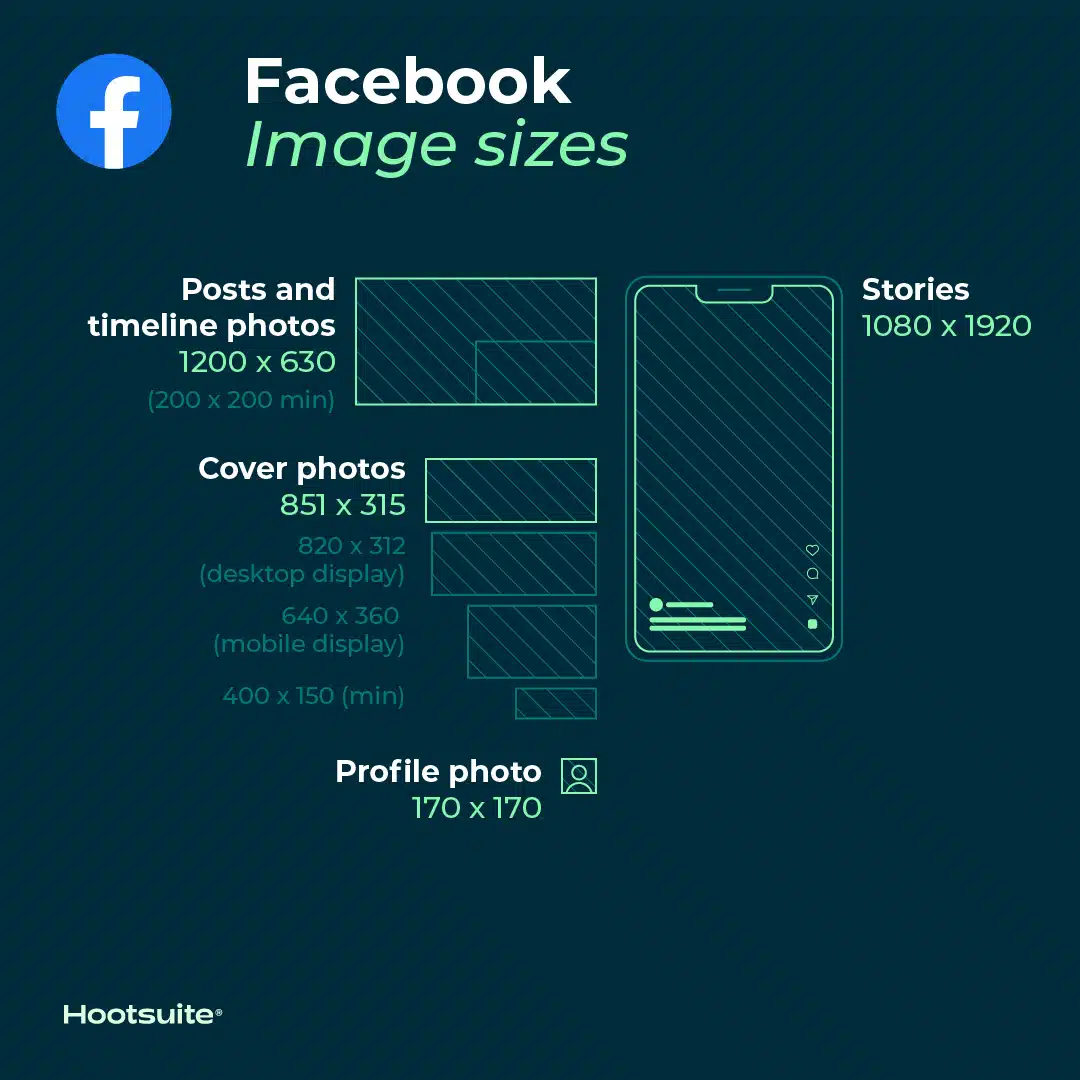
The next step is to upload a profile picture and a cover photo. The profile picture is often your business logo, while the cover photo is a larger image that represents your brand visually. Make sure these images are high-quality and align with your brand identity.
Click the camera icon and choose or upload your profile picture. When adding a profile picture, adhere to the following guidelines:
- Ensure your profile image is square, with a minimum size of 180×180 pixels.
- Since Facebook automatically crops the image into a circular shape on the user’s timeline, leave ample space around it.
- For optimal results, consider uploading an image sized at 360 x 360 or 520 x 520 pixels.
- On computers, the image will display at 170 x 170 pixels, while on mobile devices, it will appear as 128 x 128 pixels.
Remember, Facebook automatically resizes profile and cover photos to optimize their display on different devices and sections of the platform. Facebook has specific guidelines for the recommended dimensions of profile pictures and cover photos, and it automatically adjusts the uploaded images to fit those dimensions. So, by uploading an image with the suggested dimensions, you ensure that it is appropriately scaled for both computer and mobile viewing, providing the best visual experience on various devices. The specified sizes take into consideration the differing screen resolutions and display capabilities of computers and mobile devices.
Click the “Edit” icon and choose or upload your cover picture. When adding a cover picture, adhere to the following guidelines:
- The required minimum size is 400 x 150 pixels, but for optimal results, it is recommended to use an image that is at least 820 x 312 pixels.
- For even better resolution, consider utilizing an image with dimensions of 1640 x 614 pixels.
#8. Create a Username
Choose a username for your page. This will be part of your page’s URL (For example: facebook.com/username) and make it easier for people to find and remember your business.
Securing a unique username is a crucial step in establishing a business page on Facebook. This username is prominently featured beneath your page’s name and is an integral part of the page’s URL.
During the initial page creation, Facebook will allocate a random username that is neither easy to remember nor helps in discovering your page. Customizing your username allows people to locate your business more effectively by its name.
To modify your username, select the “Edit Page Info” button in the left menu and then click on the username box.
Enter your preferred username and click anywhere outside the box. Facebook will verify the availability and validity of the username. If accepted, a green checkbox will appear; otherwise, an error message will pop up indicating some issues with your chosen name.
The guidelines for usernames on business pages are as follows:
- Every page must have a distinct username.
- You are prohibited from using the username of a recognized brand, organization, or public figure.
- The official name of another business cannot be used as a username.
- Usernames should not include generic terms or extensions (.com, .net).
- Usernames may consist of alphabetical characters (A-Z), numbers (0-9), and periods (“.”).
#9. Customize Page
Customize your page further by adding more details, such as additional contact information, business hours, and a call-to-action button. The more complete your page is, the more informative and engaging it will be for visitors.
A business page lacking the capability for action is ineffective, and who would want a website without any functionality? Thankfully, Facebook provides the opportunity to include a call-to-action (CTA) button at the top of your page. Simply select “Add a Button,” and Facebook will promptly fulfill your request.
The only drawback of these CTA options is that Facebook offers only a limited selection. You’ll have to choose the button that aligns most closely with your intended action.
To include a CTA button on your page, simply click on “Add an action button.” After clicking it, Facebook will provide you with a couple of CTA options. Based on your choice, you’ll be prompted to link a phone number, website, or service (such as a food ordering app or ticket booking platform). Once the button is live, pair it with one of the Facebook tools built for marketing your business so you can track how many people actually click it.
#10. Review Page Settings
In the last step, take the time to get acquainted with the general page settings. Find the “Settings” option in the left menu to do this.
Upon clicking, you’ll observe numerous new options for managing various aspects of your page. You can systematically go through these options to review or modify their settings as needed.
In most instances, there might not be a need for any adjustments, but it’s highly advisable to manually examine all settings at least once.
#11. Publish Your Page
Once you’ve filled in the necessary information, click “Publish” to make your page live. Your Facebook business page is now officially created and visible to the public.
#12. Add Content
Start posting content to your page to engage your audience. This could include updates, photos, videos, links, or other content relevant to your business. Regularly updating your page keeps your audience engaged and informed. If a blank composer is what stops you, work from a running list of Facebook post ideas, draft the first version with a free AI Facebook post generator, and publish on a schedule that matches the best time to post on Facebook for your audience.
How Can You Best Use a Facebook Business Page?
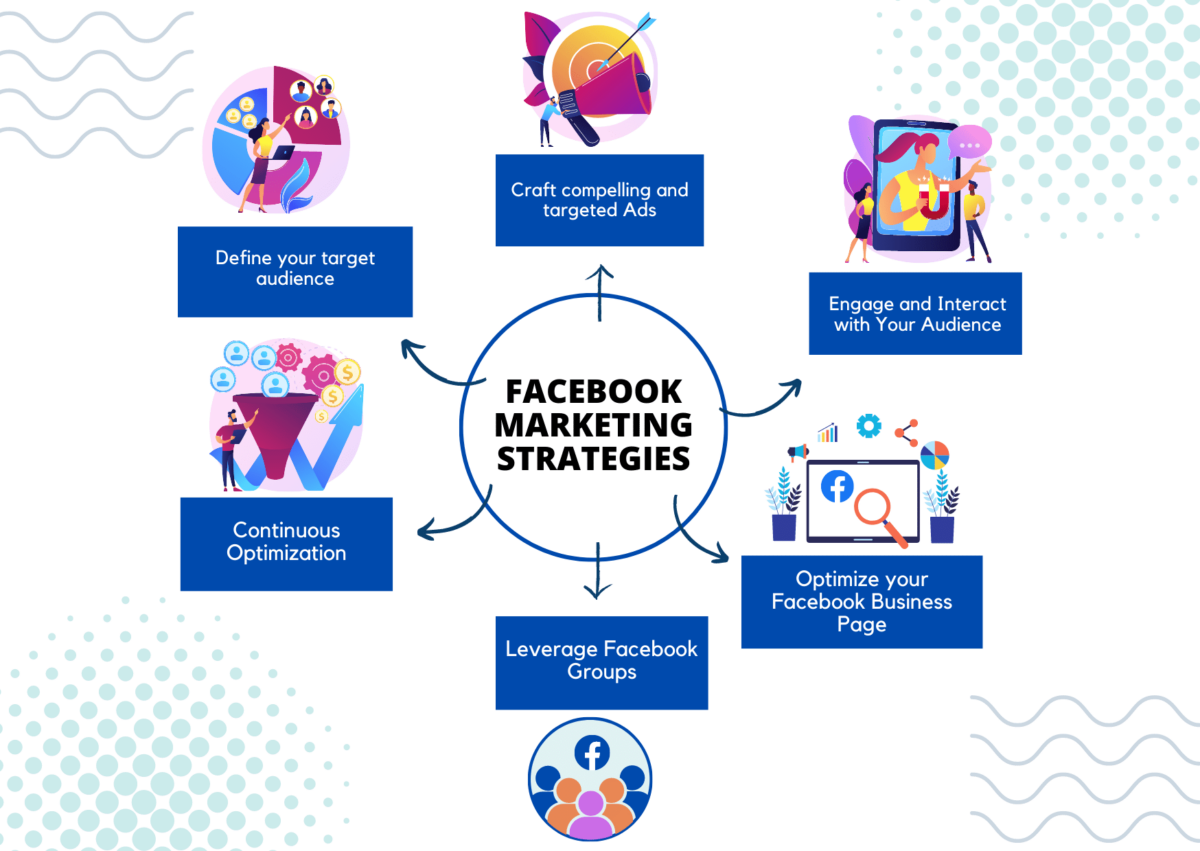
Knowing how to create a Facebook business page is one thing, but knowing how to effectively use it is an entirely different challenge.
A Facebook business page offers a range of functionality for businesses that want to build their online presence and engage an audience. What you do after publishing matters more than the setup itself, and that starts with understanding how the Facebook algorithm decides what gets seen and what kinds of Facebook posts actually earn engagement. Here are the key actions and features available to you:
- Create a professional presence. You can establish an official and professional online presence for your business.
- Share content. You can share updates, articles, photos, videos, and other relevant content with your audience.
- Engage your audience. You can interact with your audience through comments, messages, and reactions to build a community around your brand.
- Run ads. You can utilize Facebook’s advertising platform to create targeted ads and reach specific demographics.
- Analyze performance. You can access insights and analytics to track the performance of your page, understand your audience, and optimize your content strategy.
- Set up a shop. You can create a Facebook Shop to showcase and sell your products directly on your page.
- Host events. You can organize and promote events, webinars, or product launches to engage with your audience.
- Collect reviews. You can encourage customers to leave reviews and testimonials which in turn will help in building credibility for your business.
- Connect with other platforms. You can link your Instagram account, integrate third-party apps, and connect with other platforms to expand your reach.
- Access insights. You can utilize Facebook Insights to analyze page performance, audience demographics, and engagement metrics.
- Generate leads. You can use lead generation tools and forms to capture information and grow your customer base.
Frequently Asked Questions
Yes. Facebook requires an existing personal profile to create and administer a page, and that profile becomes the page’s first admin. None of your personal information is displayed on the business page, and you can add other admins later so the page is not tied to one person.
The core setup takes roughly 15 to 30 minutes if you have your business name, category, description, profile photo, and cover photo ready before you start. Adding hours, contact details, and a call-to-action button takes another 15 minutes or so.
Creating and running a page costs nothing. You only pay when you promote a post or run ads, and there is no requirement to spend anything on paid promotion to keep the page active.
Yes to both. Name changes go through a Facebook review and can be limited if you request them too frequently, while categories can be edited at any time from your Page settings, up to three at once.
Add a call-to-action button, post three to five pieces of content so the page does not look abandoned, and invite your existing customers and email subscribers to follow it. Then make sure the page itself is set up for Facebook SEO so people can find it through search.
Final Thoughts
Establishing a Facebook business page represents a significant stride in broadening your online visibility. However, a business page devoid of promotion resembles a storefront lacking a sign. While chance visits might occur, intentional discovery becomes challenging for potential visitors.
Turning a newly created Facebook page into a source of leads usually takes a mix of consistent organic posting and paid promotion. Against most other digital marketing channels, Facebook ads stay accessible to small budgets, and it helps to know what Facebook ads actually cost before you set your first daily spend.
Facebook business pages help businesses connect with their target audience, build brand awareness, and achieve their marketing objectives. Review your page settings and content strategy on a regular schedule, and if you want a place for your most engaged customers to gather, consider creating a Facebook group alongside the page.
Author Bio
Andy Beohar is the Managing Partner at SevenAtoms, a leading B2B demand generation agency. SevenAtoms is dedicated to driving growth for SaaS and B2B businesses through innovative and optimized paid search and is recognized by Google as a Google Premier Ads partner. At SevenAtoms, Andy plays a strategic role in managing paid search campaigns. Let’s connect on LinkedIn!