
Before I teach you how to create a Medium account, let me first answer the why.
As any business owner should know, the trick from being a small business to a successful empire is simply exposure
Online advertisements. Live events. Word of mouth. Social media.
These are all ways that get people to start recognizing your name and knowing what your business is all about. But right now, you’re at a disadvantage, because if you put everything into numbers, you’d know how far behind you are to your rivals — especially those who have the money or who’s been in business years before you started.
That’s why it’s the perfect time for you to start blogging on Medium, a place where 60 million people come to read great stories. Medium is still a relatively new platform, and not many businesses have discovered or fully utilized it to their advantage.
Which is why today, we are going to create a Medium account that can heighten your exposure and bring you an incredible amount of traffic to your business. Sounds good? Well, let’s begin!
1. Sign Up to Create a Medium Account
First things first, go to Medium. You’ll need to sign in using Twitter, Facebook, Google, or your email address. If you choose Twitter, Facebook, or Google to sign in, you’ll need to authorize Medium to access your account information and agree to their terms of service and privacy policy.
If you choose Twitter, Facebook, or Google to sign in, you’ll need to provide your email address, your name, and desired username (this will be your profile: https://medium.com/username).
You’ll receive an email from Medium to verify your account. Verify to continue creating your account.
Medium will then ask you to choose your interests and suggest a few top people and publications to follow.

Note: Suggestions will change depending on your interest choices.
Once you’ve chosen everything, you’ll be on the homepage with your Medium account successfully created and ready to use.
2. Create your profile
On the top right corner of the homepage, click your profile image -> Profile to go to your profile.

Click the Edit button to edit your name, bio and profile image. Crafting a compelling bio is crucial to showcase your expertise, highlight the purpose of your Medium presence, and attract a loyal following.

Pro-tip: A great strategy to bring more people to your site is to add your business URL in your bio. This will automatically be hyperlinked after you hit Save.
3. Connect your social accounts
When you link your social media accounts like Facebook and Twitter to Medium, you’re not only giving people a portal to visit your social network. You’re building a bigger Medium audience instantly — anyone following you on Twitter or Facebook who already has a Medium account will automatically follow you on Medium.
To set this up, click Settings in the menu under your profile image.
Scroll down to Connections, and connect to Facebook and Twitter.

Note: Make sure you turn on Show links to Facebook and Twitter on your profile page if you want these social media links to show up on your Medium profile.
You should also check the other settings to set email, social, and other notifications.
4. Write your stories
Now that everything’s set up, it’s time to roll up your sleeves and start writing.
Click Write a story on the top right of Medium homepage.

You’ll see how simple Medium’s interface is. It’s purely designed to minimize distractions and help you focus on the most important thing: content
Keyboard Shortcuts
A few handy-dandy shortcuts for your writing:
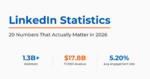
Is LinkedIn Actually Bringing You Business?
My latest book helps professionals, entrepreneurs, and business owners turn LinkedIn from a static profile into a real source of clients and growth.
Maximizing LinkedIn for Business Growth gives you clear, practical steps to build a profile that gets noticed and a network that actually sends business your way.
Grab your copy on Amazon and put it to work this week. Click the cover or the button below to get started.


Once you start getting familiar with the writing basics on Medium, you can try these advanced keyboard shortcuts.
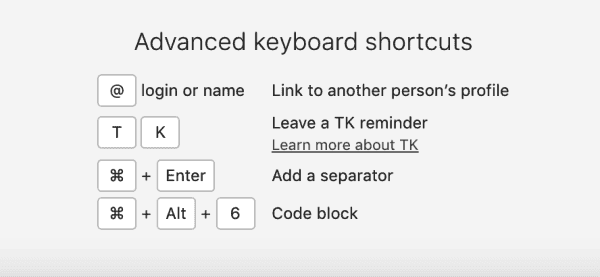
Text Edit Options
When you highlight a word or phrase, Medium gives you a few text editing options.

Bold | Italicize | Add link | Header 1 | Header 2 | Quotes | Drop cap | Private notes
Drop cap: A large capital letter at the beginning of a text block that stretches as far as two or more lines of regular text.
Private notes: Allows you to write a personal note to yourself.
Add Media, Embedded Links, Dividers
If you start a new line, you can press the + icon. That’ll give you even more options:
Add image | Add video | Embed link | Divider

Adding images and other media to your Medium story is straightforward. You can easily add images, videos, and embedded links to enhance your content. The Medium editor provides various options to customize and arrange your media elements.
Pro-tip: People tend to click more when you embed links onto your Medium post, as it expands into an attractive box with an image and brief description of the site.

Add Mentions
You can even mention other Medium users on your post by adding @username. They’ll immediately get notified unless their settings are off for ‘mention notifications’.

Add Tags
Before you publish your story, add tags that best describe your content.

You can also schedule when you want to publish your post and whether to make your post public or unlisted. Unlisted stories will only be visible to those who have the link, and won’t be shown on your profile.
For licensing, you can choose to copyright your content, give some permission for others to share your content if they credit you, or share it with Creative Commons.
Medium’s Content Guidelines
When publishing on Medium, it’s important to follow Medium’s content guidelines. These guidelines cover rules on promoting controversial content, third-party advertising, writing about cryptocurrencies, and using affiliate marketing links. Medium is open to different types and lengths of content, but adhering to these standards ensures your story remains compliant and accessible to a wider audience.
5. Import Stories
If you have content you want to move from your site onto Medium, you can import stories using the Medium website.
Click Import story in the menu under your profile image. Enter the blog article URL you want to import.

From there, you’ll be able to edit your post. The Medium website allows you to customize your content. Do know that some things don’t transfer, like images and charts. So be sure to add in any missing elements from your original post and polish up the layout (if necessary).
It’s Time Your Business Grows
With Medium, you have another channel that can bring in hundreds, if not thousands, of people to your site. By optimizing your Medium profile for digital marketing, such as using a relevant username, profile picture, bio, and tags related to digital marketing, you can attract followers and increase visibility. All it takes is the first step: setting up your Medium account.
Writers can also earn money through the Medium Partner Program by monetizing their stories. By putting their stories behind a paywall for premium members, writers can earn based on member reading time. This is a great way to earn money for the stories you are already producing for the platform.
One last word of advice: On the Medium platform, genuine and thoughtful responses are significant for increasing visibility and supporting other writers. Engaging with the Medium community can enhance your visibility, grow your audience, and expand your online presence. Building connections, leaving thoughtful comments, and interacting with other writers will help establish your credibility within the Medium community.
Best of luck!
Author Bio
Tiffany Sun is an expert on Medium. Tiffany is an online marketer & millennial at Rabbut, a tool that allows businesses and individuals to collect emails on their blog and have their latest posts automatically delivered to their subscribers.


Hello, after I put my publication online and sent it to my friend to view it. But it went to suspended page and unavailble since then. So do you know what’s the problem about?
Thank you!
Very clear explanations and guide. Thank you.
I appreciate the attention to detail,the pro tips and infographic type screen shots – feel ready!