
These days, social media is one of the most important places for businesses to reach customers. This is true even though most social media networks are increasingly paying to play. However, on LinkedIn, the situation is a bit different. Not only is LinkedIn a great place to recruit new employees, but it’s an advertising goldmine. Every business should have a Company Page on LinkedIn. Period. It is free advertising. With that in mind, here’s how to create a company page on LinkedIn.
Key Takeaways
✅ Company Pages are free and built from the desktop: find Create a company page under the Work icon; the mobile app cannot create pages.
✅ You’ll choose from four page categories: small business, medium to large business, showcase page, or educational institution, with the setup flow nearly identical across all four.
✅ The build runs twelve steps in two phases: four creation steps covering category, identity, details, and branding, then eight refinement steps from your description through your cover image.
✅ Two fields carry your SEO weight: the 2,000-character description and the 20 specialties are where your keywords live, so fill both deliberately.
✅ The page isn’t done until it’s alive: post your first status update, then use your 100 monthly invite credits, which return to you whenever a connection accepts.
Some Reminders of Why LinkedIn is So Important for Business
As our world gets more digitized, businesses must do more and more advertising online. For many businesses, LinkedIn started out as a place to recruit new employees. But it wasn’t the site of a lot of commercial activity per se. However, this has changed. LinkedIn is still a great place to find new employees, but it’s also a great place to see and be seen, gathering leads in the process.
It is the best place for B2B leads
As hinted above, LinkedIn is the best place for finding B2B leads, and after more than 15 years of helping companies turn the platform into a revenue channel, I have seen why firsthand. Decision-makers are on LinkedIn in a professional mindset, researching vendors and solutions, which is a fundamentally different context from the entertainment scrolling that dominates other networks. If you consider that LinkedIn is primarily a business network, it makes sense that it would be highly effective at lead generation. Knowing how to create a company page on LinkedIn gives your business a home base for all of that lead-generating activity.
It is the best place for B2B content marketing
Secondly, as everyone knows I am a big fan of content marketing. This is especially true because it works, but I also find that the customer education aspects of content marketing are a great way to be a good neighbor. People feel the best about doing business with companies that demonstrate that they are valued.
For B2B brands, LinkedIn is the place for content marketing. Nearly every B2B content marketer I know distributes through LinkedIn in some form, whether through posts on executive and employee profiles, articles, newsletters, or company pages. If you know how to create a company page on LinkedIn, it’ll be easier for you to distribute this type of content and build an owned audience for it.
Where to Begin to Create a Company Page on LinkedIn
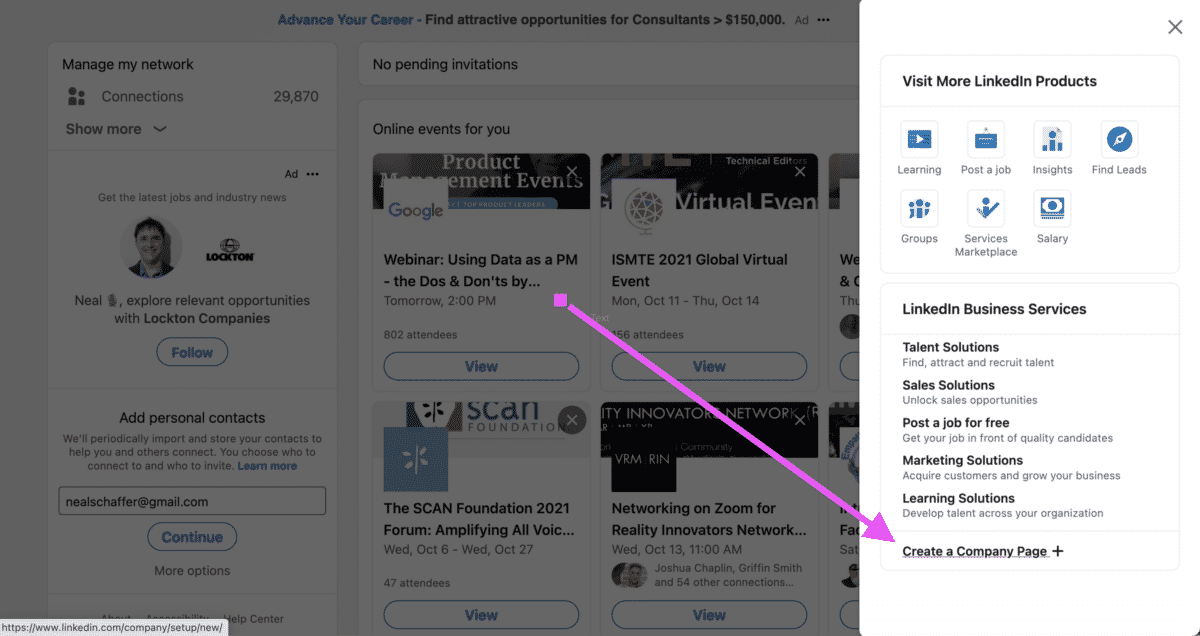
Find the link to create a company page on LinkedIn under Work in the righthand side of the top menu bar and at the bottom of the menu. Note that currently Company Pages on LinkedIn can only be created on the desktop, not their mobile app. Luckily, the process of how to create a company page on LinkedIn is super easy once you find the right link. Once you have found it, follow these steps.
Step 1: Choose Your Company Page Category

After clicking the link, you will need to choose a category for your LinkedIn Company Page. Choosing the right category helps LinkedIn populate the right options for your company. They offer four basic categories of LinkedIn company pages.
- Small Business (fewer than 200 employees): Typically, these are mom and pop shops or professional service providers with one location, or perhaps a couple of smaller ones in a specific geographic area.
- Medium to Large Business (more than 200 employees): Here, you have a very large range of company sizes. These can be small regional chains all the way to multinational corporations. It’s interesting that there aren’t any more detailed size-based classifications.
- Showcase Page – these are sub-pages associated with a current Company Page and thus outside of the scope of this post, but the process is easier as fewer details are needed for a Showcase Page because they are already included in your Company Page.
- Educational Institution: LinkedIn classifies educational institution as encompassing institutions of learning for any age, ability level, or type. In other words, this could be a preschool, grade school, vocational training center, college, or anything else that teaches.
The process for each of the pages is fairly similar, but we will use small businesses as an example for this blog post. This is because the small business category is easy to understand, and the other categories build on this type. After selecting your category, you will then be able to set up and launch your page on the next screen, where you will need to follow the next steps.
Step 2: Set Your Page Identity
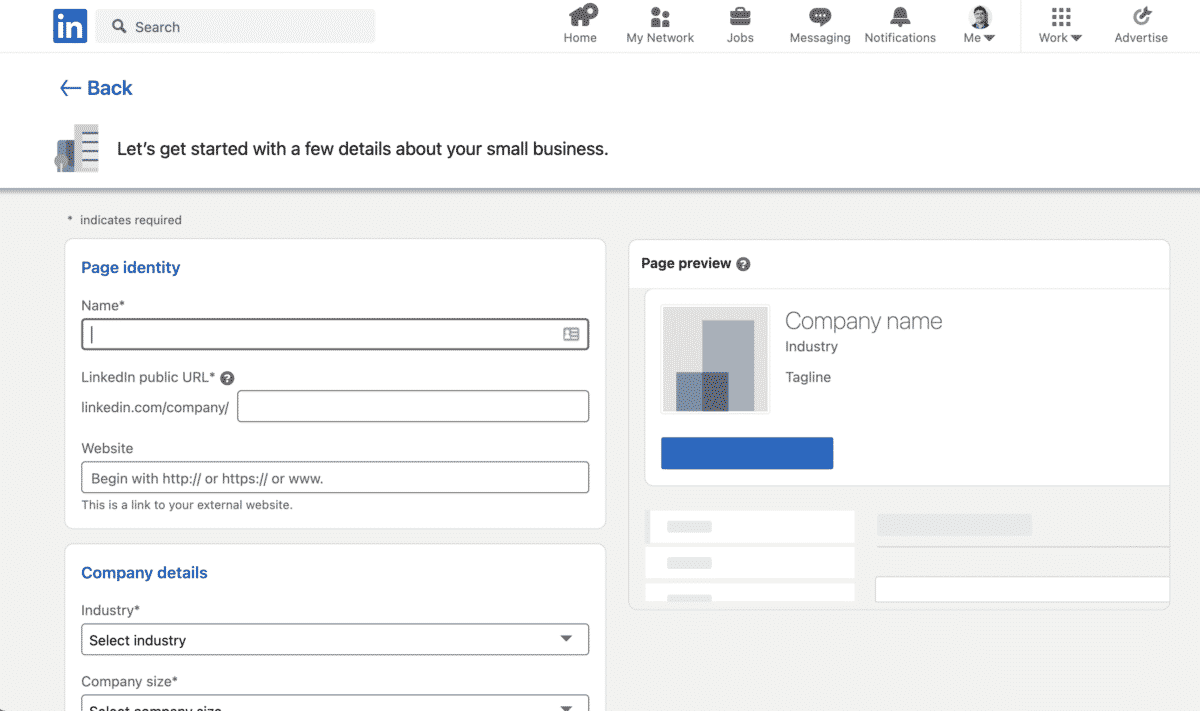
Next, you want to tell LinkedIn which company you want to identify. These are fields that will show up on the finished page, so it’s important to ensure everything is accurate and proofread. First, include the company name. This can be the “doing business as (DBA)” or any subsidiary of a larger company. The important thing is that the company name is what people will recognize you as.
Then, you set the company page URL. In this case, you’re making a LinkedIn custom URL that’s similar to the ones available to individuals. Typically, you want to use an easily recognizable version of your company name. You might have to be somewhat creative, though, if other companies have similar names and have claimed a URL already.
Finally, you need to add the company website URL. Because of the frequency with which landing pages change, don’t use one for this field. Instead, use your homepage for the display address. You can always use landing pages in LinkedIn postings or other content.
Step 3: Enter Your Company Details

Another important aspect of how to create a company page on LinkedIn is mastering the company details. Here, LinkedIn wants to “sort” your business into the right category: What kind of services do you provide, how large is the business, and what kind of company? This information is also helpful to potential customers and job seekers, especially if they have preferences like company size.
On LinkedIn, the fields that populate are industry, company size, and company type. The industry is self-explanatory: if you fix automobiles, or if you sell them, you’re in the automotive industry. However, an individual auto repair shop might have 20 employees and one location, while many car dealerships are in multi-location corporations and might well meet the definition of “medium” for LinkedIn. However, you can get more specific for company size if you want.
Finally, there’s the company type. This isn’t as obvious upfront as the other two categories, but part of how to create a company page on LinkedIn is properly stating your company type. For small businesses, it’s often an LLC or partnership. Larger companies tend to be corporations. So, select the one which is most appropriate for your business.
Step 4: Promote Your Branding

Once you’ve finished with the basics it’s time to add your branding to the LinkedIn company page. Your first task is to add a logo. This should be uploaded in the formats currently accepted by LinkedIn, often jpeg. As a rule, the 300×300 size is recommended for most logos. This way, your logo will look its best. Once the logo has been uploaded, add your company tagline or motto. By doing this, you’ll both promote your branding and tell people what your company is all about.
Refining your LinkedIn company page

Once done with these 4 steps your page will be created and then you progress to the refinement stage of Company Page creation. This is done by editing the following items on your newly created LinkedIn Company Page. In order to reach these settings, click on “Edit Page,” which appears as a button underneath where your cover image will soon be added! Here are the more detailed instructions on how to create a company page on LinkedIn.
Step 5: Add Overview Info to Your Header
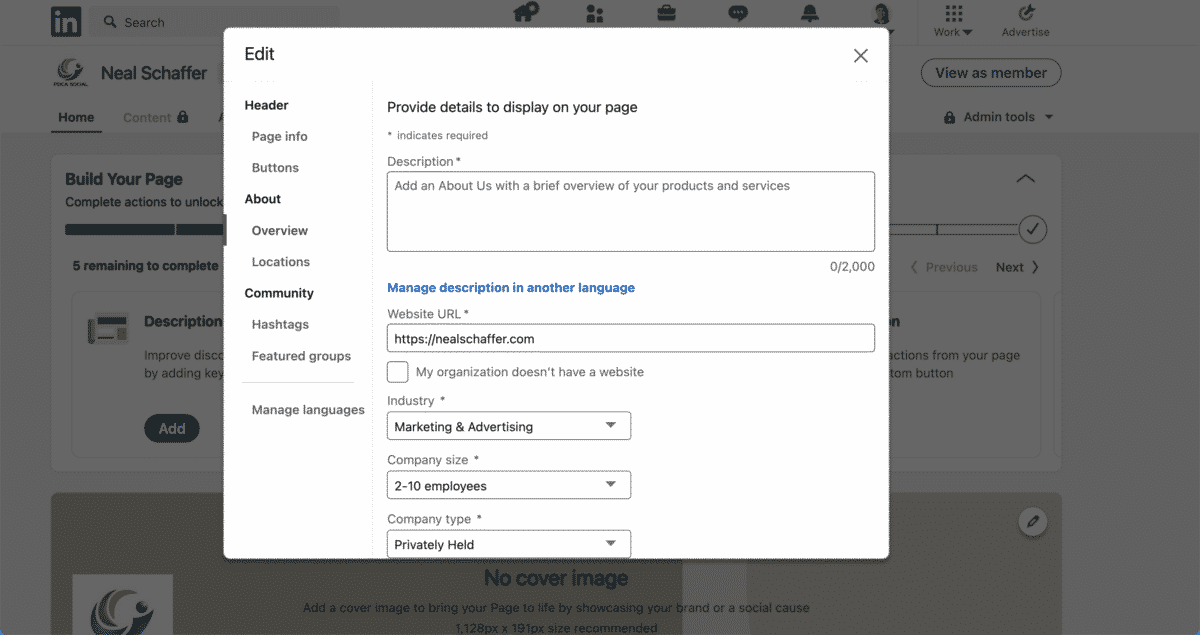
This is all done on the screen that appears next, which is equivalent to About –> Overview in the edit popup menu.
- Add an up to 2,000-character description – This is good for SEO! Be sure to choose a couple of great keywords for your overall company description.
- Add a phone number– In most cases, this should be your 800 number for the corporate office if you’re a large business, or the location phone if you’re smaller.
- Add what year you were founded– Don’t turn down an opportunity to crow about your years of successful business.
- Add up to 20 specialties – Also good for SEO! You should be able to add more keywords here.
Step 6: Add a Custom Button to Your Company Page

You’ll next navigate to the Header –> Buttons area of the menu popup that you edited information in Step 5. You won’t need to bother with Header –> Page Info because you already filled that out when creating your page.
This custom button will be featured prominently under your cover image so use it strategically! Add button names from the preselects that LinkedIn allows you to choose from. These are descriptive of what part of your website you want people to go to, such as the sales department. Then, add the URL to your button and click save.
Step 7: Add Locations

Since you already completed the About –> Overview step you can now navigate down to About –> Locations to add the full addresses of any office locations that you have, which will make it easier for your company to appear in local searches. If you’re in a service-related field such as auto repair or plumbing, this is especially important. For multinational corporations or larger companies, you might list the major offices or national headquarters.
One Strategy to Connect All Your Marketing
My latest book helps small businesses, entrepreneurs, and marketers bring search, email, and social together into one digital marketing strategy that actually compounds.
Drawing on my work as a Fractional CMO, Digital Threads turns complicated tactics into a clear, practical plan you can follow, whatever your budget or team size.
Grab your copy on Amazon and start weaving your own digital threads. Click the cover or the button below to get started.

Step 8: Add Strategic Hashtags
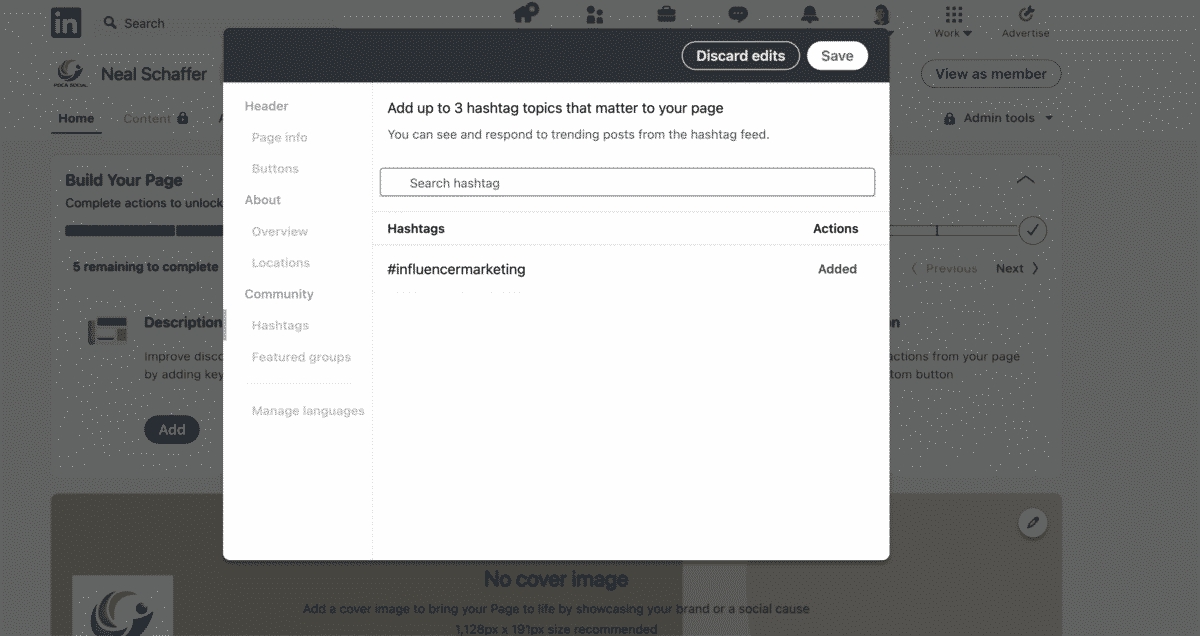
LinkedIn Company Pages can’t engage as a person on LinkedIn unless someone replies to one of their status updates. However, LinkedIn gives Company Pages the ability to engage in trending content if it contains one to three strategic hashtags that you determine to be strategic to your company. This is where you enter them, by navigating on the same pop-up menu down to Community –> Hashtags. Be sure to do hashtag research as appropriate to pick the best ones.
Step 9: Add LinkedIn Groups

If you have a LinkedIn Group, LinkedIn gives your Company Page visitors the ability to join it directly from your page. Enter it under the final menu item in the pop-under Community –> Featured groups. By the way, having a group is a smart choice for most businesses.
Step 10: Add a Cover Image

Once you complete Step 9 you might think that you are done as you have completed all of the items in the edit popup menu. However, there is something strategic not in the edit menu that you should do: Add a cover image! By clicking on the pencil icon in the top righthand corner of where your cover image should be, you will have the ability to upload it. Note that the recommended size is 1,128px x 191px. Of course, this is a rather large image, so you have a significant amount of flexibility. Just make sure it reflects your company.
Step 11: Post Your First Status Update!
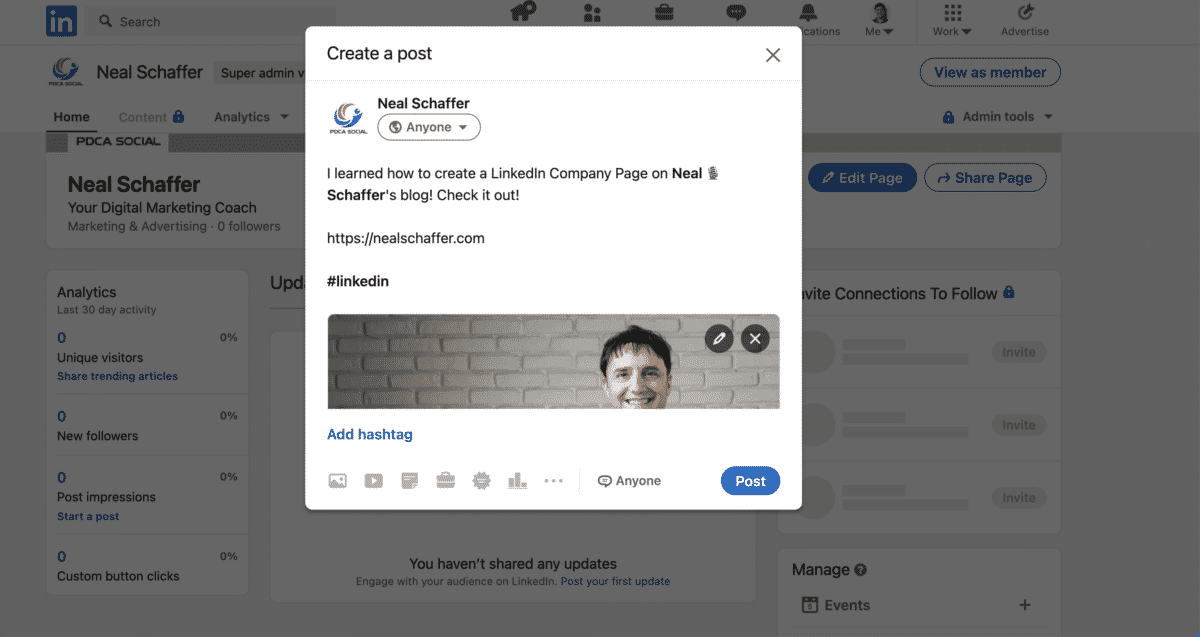
You can’t complete the creation of a Company Page on LinkedIn until you post your first status update from your page, so go for it!!! Remember, you can and should change the status fairly regularly to reflect company events. For instance, if you’re going to hold a hiring event, brag about it so relevant talent will see it. Or, if you’re launching or promoting a particular product, invite people to check it out. And as always, add hashtags as appropriate.
Step 12: Invite Your LinkedIn Connections to Follow Your new Page!
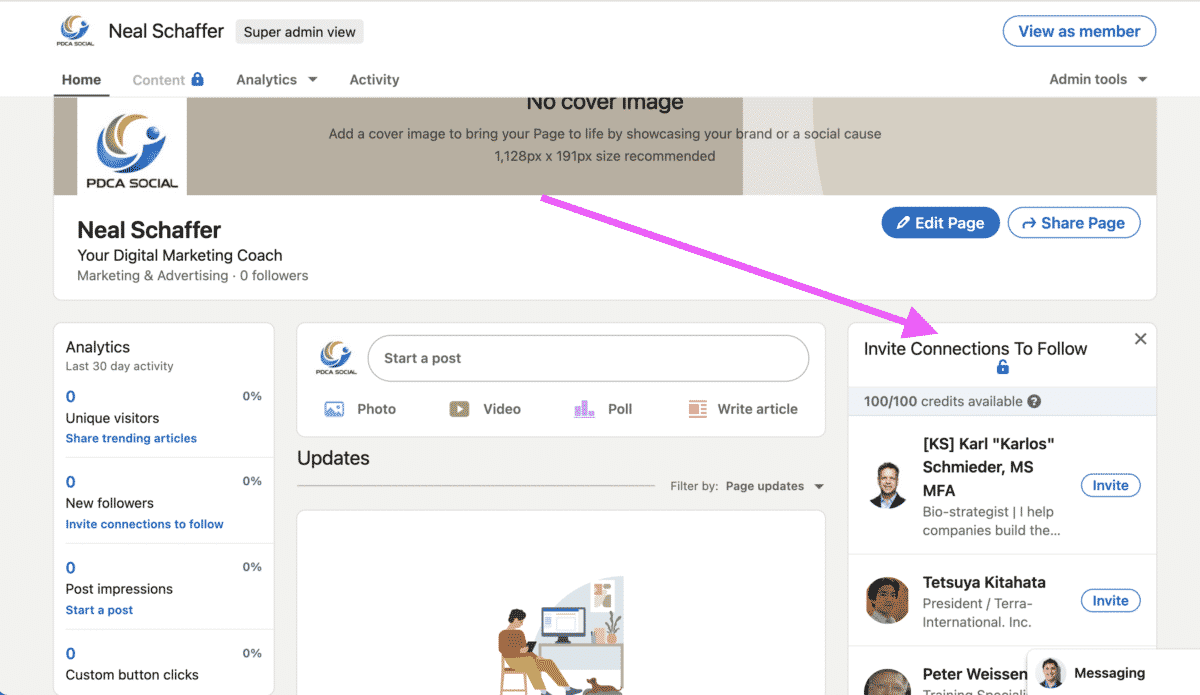
Don’t forget to click on the Invite Connections to Follow area on the right-hand side of your Company Page under your cover image. This begins the process of inviting your connections to follow your page. You get 100 credits to invite your connections every month, and if a connection accepts your invite, your credit is returned to you allowing you to invite more of your connections. If you do this right, then you can add connections rather quickly. In this way, you can be sure to get the most out of knowing how to create a company page on LinkedIn.
Frequently Asked Questions About LinkedIn Company Pages
On the desktop version of LinkedIn, click the Work icon in the top menu bar and select the option to create a company page at the bottom of the menu. From there, choose your page category, enter your company name, custom URL, and website, complete your company details, and add your logo and tagline.
Yes. Creating and maintaining a LinkedIn Company Page costs nothing, which is why every business should have one. You only pay if you choose to run LinkedIn Ads from the page. The page itself, including your description, specialties, locations, custom button, and unlimited posting, is free advertising.
No. Company Pages can currently only be created on the desktop version of LinkedIn, not through the mobile app. Once your page exists, you can manage it and post updates from mobile, but the initial creation process requires a desktop browser.
Your logo should be 300 x 300 pixels, which displays cleanly everywhere LinkedIn shows it. The cover image at the top of your page should be 1,128 x 191 pixels, a wide format that gives you significant flexibility, so make sure whatever you upload reflects your company well.
LinkedIn gives page administrators 100 invite credits per month. When a connection accepts your invitation, that credit returns to you, allowing you to invite someone else. Done consistently, this credit-recycling system lets you grow your page’s follower base surprisingly quickly at no cost.
Your LinkedIn Company Page Is Live. Now Put It to Work
Creating a company page on LinkedIn comes down to twelve steps: choose your category, set your identity and details, add your branding, then refine the page with your description, custom button, locations, hashtags, groups, and cover image before posting your first update and inviting your connections. For most business owners, that setup is just the beginning. LinkedIn is a major driver of sales leads, especially in the B2B space, and your company page is the free home base that recruiting, content distribution, and lead generation all build on. Keep the page active with regular updates, and it will keep working for you.


Hello! I’m at work browsing your blog from my new iphone 4! Just wanted to say I love reading your blog and look forward to all your posts! Carry on the outstanding work!
New iPhone4? WOW!
Hi Neal,
Much as a traditional LinkedIn profile provides business opportunities for marketers, a company page on the professional networking site offer added privileges. It gives you a platform to display updates that may have only relied on a traditional regular profile for exposure. Also, while a LinkedIn profile allows you to exhibit your skills and expertise, a company page enables you to build your brand and further expand your network.
Thanks a lot for the incredible tutorial!
Thank you for your comment Moss – and I couldn’t agree more!