Editorial Note: I may earn a commission when you visit links that appear on my website.
How to Post on Pinterest: Complete Step-by-Step Guide (2026)
Posting on Pinterest works differently than most social platforms. You create a Pin with an image or video, title, description, destination link, and board placement. Each element serves a purpose in Pinterest’s visual search engine.
85% of weekly Pinners have made a purchase based on Pins they saw from brands—that’s significant buying intent.

This complete guide shows you exactly how to create and publish Pins from desktop and mobile. You’ll learn the specific steps for images, videos, and carousel Pins, plus scheduling, deletion, and optimization best practices.
Pinterest rewards quality content posted consistently. Most businesses fail because they treat Pinterest like Instagram. It’s not—Pinterest is a search platform where people actively look for solutions, ideas, and products to buy.
Let’s get started.
Quick Start: Post Your First Pinterest Pin
Short on time? Here’s the fastest path to posting:
- Click the + icon (bottom-right on desktop, bottom-center on mobile)
- Upload your image (1000 x 1500 pixels, vertical format)
- Add a keyword-rich title (under 60 characters for mobile visibility)
- Write a description (include relevant keywords naturally, up to 500 characters)
- Add your destination link (where users go when they click)
- Select a board (organize by topic)
- Click Publish
For detailed instructions by device and content type, keep reading →
Types of Pinterest Pins
Before diving into how to post, understand the different Pin formats:
- Standard Pins: Single image with title, description, and link
- Video Pins: Short videos (6-15 seconds) or longer tutorials
- Carousel Pins: 2-5 swipeable images in one Pin
- Idea Pins: Multi-page native content (no outbound links)
- Product Pins: Enhanced Pins with pricing and purchase info
This guide covers how to create standard, video, and carousel Pins—the three most common formats for businesses.
Before You Start: Account Requirements
To post on Pinterest, you need:

- A free Pinterest account (personal or business)
- Images or videos to upload
- Optional: A website URL to drive traffic
- Recommended: High-quality vertical images (1000 x 1500 pixels)
Don’t have an account yet? Creating one takes 2 minutes at pinterest.com/signup.
Already have a personal account? Convert to a business account for free analytics and Rich Pins.
How to Post on Pinterest from Desktop
Desktop posting gives you more control over your Pin details and easier access to advanced features. Most business accounts benefit from creating Pins on desktop first.
Start by opening Pinterest in your web browser. Log in to your Pinterest account using your email and password. If you’re managing a business account, make sure you’re logged into the correct profile.

The process follows this sequence:
- Click the plus icon (+) in the bottom-right corner of your screen
- Select “Create Pin” from the dropdown menu
- Click the large upload area or drag your image file directly onto the screen
- Choose your image file from your computer (PNG, JPG, or JPEG formats work best)
- Wait for the upload to complete before adding details
Desktop Tip: You can also drag and drop image files directly onto the upload area instead of clicking to browse.
Now add your Pin information. Type your title in the title field at the top. Pinterest allows up to 100 characters, but keep it under 60 for mobile visibility.
Write your description in the larger text box. You have 500 characters available. Use natural language that includes keywords people search for. Don’t stuff keywords awkwardly.
Add your destination link in the field labeled “Add a destination link.” This is where people go when they click your Pin. Most businesses link to blog posts, product pages, or landing pages.
Selecting Your Board and Publishing
Click the board dropdown to choose where your Pin will live. If you haven’t created boards yet, click “Create board” and name it. Boards should organize content by topic, not randomly.
You can add your Pin to multiple boards by clicking “Add to another board” after selecting your primary board. This increases visibility without creating duplicate Pins.
Before publishing:
- Check for typos in title and description
- Verify your link works correctly
- Confirm you selected the right board
Click the red “Publish” button when ready. Your Pin goes live immediately and appears on your profile and selected board. Pinterest begins showing it to relevant users through search and recommendations.
How to Post on Pinterest from Mobile App
Mobile posting works well for quick Pins and phone-created content. Open the Pinterest app, tap the plus icon (+) at the bottom center, and select “Pin.”
The mobile posting process differs slightly by device:
Make LinkedIn Your Best Source of Clients
My latest book helps professionals, entrepreneurs, and business owners turn LinkedIn from a static profile into a real source of clients and growth.
Maximizing LinkedIn for Business Growth gives you clear, practical steps to build a profile that gets noticed and a network that actually sends business your way.
Grab your copy on Amazon and put it to work this week. Click the cover or the button below to get started.

iOS Mobile Posting Steps
- Tap “Camera roll” to select an existing image or “Take photo” to capture new content
- Choose your image from your phone’s photo library
- Tap “Next” in the top-right corner
- Add your title in the title field (tap the field to open keyboard)
- Write your description in the description field
- Tap “Add link” to include your destination URL
- Select your board from the board picker
- Tap “Done” or “Publish” to post your Pin
Android Mobile Posting Steps
- Tap the image icon to access your device gallery
- Select the photo you want to upload
- Tap “Next” at the bottom of the screen
- Enter your title in the text field at the top
- Add your description below the title
- Tap “Add destination link” and paste your URL
- Choose your board by tapping the board selector
- Tap “Publish” to create your Pin
Mobile uploads happen quickly on cellular or WiFi. Large image files may take longer to upload. Wait for the upload to finish before adding text details.
You can edit Pins after publishing on mobile. Tap any Pin on your profile, then tap the three dots (…) in the corner to access editing options.
How to Post a Video on Pinterest
Video Pins capture attention in feeds and search results. Pinterest supports standard videos and the newer Idea Pin format for short-form content.
Videos must meet Pinterest’s technical requirements. Files should be .mp4 or .mov format. Recommended length runs between 6 and 15 seconds for standard Pins, though longer videos work for tutorials.
Upload video Pins using the same process as image Pins—just select your video file (.mp4 or .mov) instead of an image during upload. Wait for processing to complete, then add your title, description, and link.
Pinterest generates a thumbnail from your video automatically. You can change this thumbnail by clicking “Edit” on desktop after uploading. Choose a clear, engaging frame that represents your video content.
Video Pin Best Practices
Square or vertical videos perform better than horizontal. Vertical images sized at 1000 x 1500 pixels with a 2:3 aspect ratio are optimal for Pinterest. Apply the same ratio to videos.
Add captions or text overlays to your videos. Many users watch without sound. Your video should communicate its message visually.
The first 3 seconds determine whether users keep watching. Start with your most compelling visual or promise immediately.

How to Post Multiple Images on Pinterest
Carousel Pins let you share multiple images in a single Pin. Users swipe through your images, seeing up to 5 different photos or graphics.
This format works well for step-by-step tutorials, before-and-after comparisons, or product collections. Each image in your carousel should relate to the same topic or theme.
Create a carousel Pin from desktop only (mobile creation isn’t available yet):
- Click the plus icon (+) and select “Create Pin”
- Click “Create from multiple images” or the carousel option
- Upload 2-5 images by clicking or dragging files
- Arrange images in your preferred order by dragging thumbnails
- Add a title and description that covers all images
- Include your destination link
- Select your board and publish
Each image in your carousel maintains the same destination link. You can’t assign different links to individual images within one carousel Pin.
Carousel Pins receive higher engagement than single-image Pins for certain content types. Test this format against standard Pins to see what your audience prefers.
Best Practices for Posting on Pinterest
Pinterest rewards specific behaviors and content types. These practices come from actual platform performance, not theory.
Image Quality and Dimensions
High-quality images perform better than low-resolution photos. Your images should be clear, well-lit, and visually appealing. Pinterest is a visual platform, so image quality directly affects engagement.
Vertical images get more impressions than square or horizontal formats. The 2:3 aspect ratio fills mobile screens without cropping. Create images at 1000 x 1500 pixels minimum.
Brand consistency matters. Use similar colors, fonts, and styles across your Pins. This builds recognition as users see your content repeatedly in feeds and search.
Don’t have design experience? Use these free tools to create Pinterest-optimized graphics:
- Adobe Express: Quick pin designs
- Canva: Pre-sized Pinterest templates
- Snappa: Photo editing and overlays
More free tools for making Pinterest images.
Writing Effective Titles and Descriptions
Include keywords naturally in your titles and descriptions. Think about what words people type when searching for your content. Pinterest’s search algorithm reads your text to determine relevance.
Titles should clearly describe what users get by clicking. Avoid clickbait or vague headlines. Specific titles like “15-Minute Dinner Recipes for Busy Weeknights” work better than “Amazing Dinner Ideas.”
Descriptions expand on your title with additional context. The first 50-60 characters appear in search results, so front-load important information. Add relevant details and a clear call-to-action.
Using Rich Pins
Rich Pins perform better than standard Pins by providing more context. These enhanced Pins sync information directly from your website.

Four Rich Pin types exist: product, recipe, article, and app. Set up Rich Pins by adding metadata to your website and validating your domain with Pinterest. This one-time setup applies to all future Pins from your site.
Product Rich Pins show real-time pricing, availability, and purchase links. Recipe Rich Pins display ingredients and cooking times. Article Rich Pins include headlines and descriptions automatically.
Quick Win: Rich Pins are free and take about 15 minutes to set up once. They permanently improve all future Pins from your website.
Posting Frequency and Timing
Consistency beats volume on Pinterest. One quality Pin daily outperforms ten mediocre Pins posted sporadically.
Test posting times for your specific audience. General data suggests 1 p.m. works well, but your audience might engage more at different hours. Check your Pinterest analytics after a few weeks to identify patterns.
Avoid posting duplicate Pins to the same board repeatedly. Pinterest penalizes this as spam. You can share the same Pin to multiple boards or repin content after several months.
Organizing Your Boards Strategically
Create boards around topics your target audience searches for. Board names should use keywords people actually type. “Healthy Dinner Ideas” performs better than “Yummy Foods.”
Each board needs a clear description with relevant keywords. This text helps Pinterest understand your board’s topic and show it in relevant searches. Write 100-200 characters describing what users find on the board.
Keep boards focused on specific themes. A scattered board with unrelated Pins confuses both users and Pinterest’s algorithm. Consider creating strategic boards that align with your business goals.
Leveraging Pinterest Analytics
Business accounts get free access to Pinterest Analytics. This tool shows which Pins drive traffic, engagement, and conversions. Check analytics weekly to understand what works.
Look for patterns in your top-performing Pins. Notice common elements like colors, topics, or formats. Create more content similar to what already performs well.
Track your audience demographics and interests. Pinterest tells you who saves your Pins and what else they care about. Use this information to refine your content strategy.
| Metric | What It Tells You | How to Use It |
|---|---|---|
| Impressions | How often your Pins appear in feeds and search | Measure reach and visibility |
| Saves | How many users bookmark your Pin to their boards | Indicates content value and future reach |
| Clicks | Traffic sent to your website from Pinterest | Measures direct response and interest |
| Engagement Rate | Total interactions divided by impressions | Shows content relevance to your audience |
Compare different Pin formats to see what resonates. Video, carousel, and static image Pins each serve different purposes. Test all formats to find your optimal mix.
Common Pinterest Posting Mistakes to Avoid
❌ Posting horizontal images – They get cut off on mobile
❌ No destination link – Reduces traffic potential
❌ Keyword stuffing – Sounds robotic and gets penalized
❌ Duplicate Pins to same board – Pinterest flags as spam
❌ Posting and forgetting – Consistency matters more than volume
❌ Ignoring analytics – You can’t improve what you don’t measure
Avoid these mistakes and you’ll outperform 80% of Pinterest users.
Advanced Pinterest Posting Features
Scheduling Pinterest Posts
Pinterest’s native scheduling tool helps you plan content in advance. Consistent posting matters more than volume.
Best times to post on Pinterest (according to SproutSocial research):
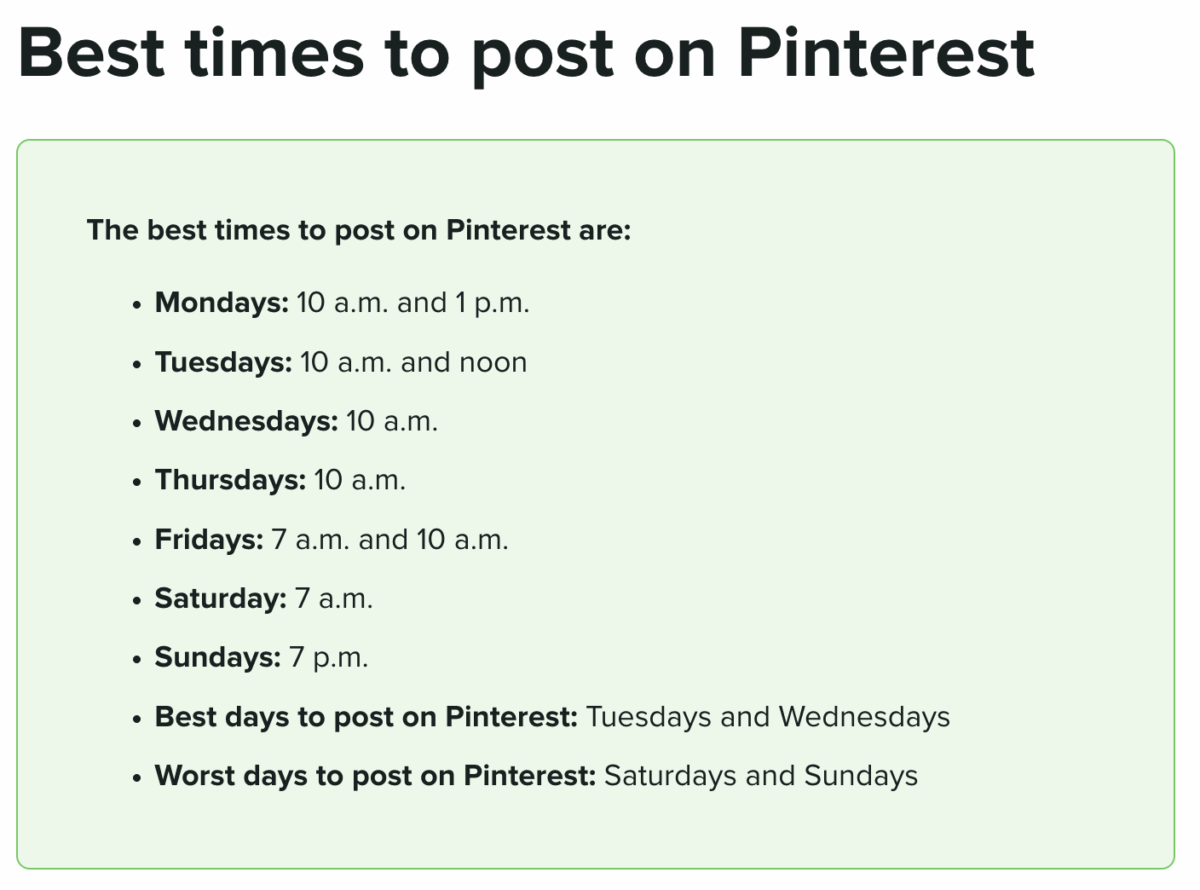
Research shows 1 p.m. consistently performs well, but test times for your specific audience.
Schedule Pins directly from Pinterest on desktop:
- Create your Pin following the standard process
- Before clicking “Publish,” look for the schedule option
- Click the calendar icon or “Schedule” button
- Choose your date and time
- Click “Schedule” to confirm
Scheduled Pins appear in your scheduler dashboard. Access this by clicking your profile, then selecting “Scheduled Pins” from your settings or content menu.
Using Third-Party Scheduling Tools
Several tools offer more features than native Pinterest scheduling. Buffer, Tailwind, and Hootsuite all integrate with Pinterest.

These platforms let you schedule multiple Pins at once, recycle top-performing content, and manage several Pinterest accounts. Most require paid subscriptions for full features.
Tailwind was built specifically for Pinterest and offers SmartSchedule, which posts at optimal times automatically. It also suggests content intervals based on your account size.

I mention these tools because scheduling saves time while maintaining consistency. You can batch-create Pins once weekly instead of posting daily.
Managing Your Pinterest Content
How to Delete a Pin
Removing Pins permanently deletes them from Pinterest. This action can’t be undone, so verify you want to delete before confirming.
Delete a Pin from desktop:
- Navigate to your profile and find the Pin
- Click on the Pin to open it
- Click the three dots (…) in the corner
- Select “Delete Pin” from the dropdown menu
- Confirm deletion in the popup window
Delete a Pin from mobile:
- Open your profile in the Pinterest app
- Tap the Pin you want to remove
- Tap the three dots (…) in the corner
- Tap “Delete Pin”
- Confirm by tapping “Delete” again
Deleted Pins disappear from all boards where you saved them. If other users saved your Pin to their boards, those copies remain visible but lose attribution to your account.
How to Archive Pins Instead
Consider archiving instead of deleting. Archive Pins by moving them to a secret board. This preserves the Pin while hiding it from public view. You can restore archived Pins later by moving them back to public boards.

Common Questions About Posting on Pinterest
Is it free to post on Pinterest?
Yes, posting on Pinterest is completely free for all users. You can create Pins, boards, and share content without paying fees. Pinterest offers optional paid advertising features, but organic posting requires no payment.
How do I get started on Pinterest as a beginner?
Start by creating a free account, then build boards organized by interests or topics. Save Pins you like, follow other users and boards, and gradually create your own Pins using images and descriptions. Use keywords in titles and descriptions to improve discoverability. Learn more about using Pinterest for business growth.
What’s the best way to share my art on Pinterest?
Upload your artwork as a Pin by selecting “Create” and choosing “Create a Pin.” Add a high-quality image, write a descriptive title with keywords (up to 100 characters), include a detailed description (up to 500 characters), and link to your portfolio or website if desired. Organize your art into themed boards for better visibility.
Can I edit a Pin after publishing it?
Yes, you can edit your Pin title, description, link, and board placement after publishing. Click or tap the Pin, select the three dots (…) menu, and choose “Edit Pin.” Changes save automatically when you update the information.
Should I use a personal or business Pinterest account?
Use a business account if you plan to promote products, services, or drive website traffic. Business accounts get free analytics, Rich Pins, and advertising options.
Personal accounts work fine for casual pinning without business goals. You can convert a personal account to business at any time—the switch is free and takes about 2 minutes.
Personal accounts can still post Pins, but you’ll miss out on valuable data and enhanced features that help your content perform better.
How often should I post on Pinterest?
Post at least one high-quality Pin daily for consistent results. Pinterest’s algorithm favors regular activity over sporadic posting. New accounts should aim for 3-5 Pins per day during the first month to build momentum, then maintain 1-3 daily Pins.
What file formats does Pinterest accept?
Pinterest accepts PNG, JPG, and JPEG for images. Videos should be .mp4 or .mov format. Images should be under 20MB, and videos under 2GB. Recommended dimensions are 1000 x 1500 pixels (2:3 aspect ratio) for optimal display.
Your Next Steps on Pinterest
You now know exactly how to post on Pinterest from any device. Create your Pin, add optimized text, select a board, and publish.
What matters most is consistency and quality. Start with one Pin daily using the optimal 1000 x 1500 pixel size. Write clear titles with keywords your audience searches for. Include compelling descriptions that explain what users get.
Test different content types over the next 30 days. Try standard image Pins, videos, and carousels. Check your analytics after two weeks to see what performs best. Double down on formats that drive saves and clicks.
Most businesses give up on Pinterest before seeing results. The platform takes time to build momentum. Your Pins continue reaching new users months after posting. That’s different from Instagram or Facebook, where content dies in 24 hours.
Create your first Pin today using the desktop or mobile steps above. Choose your best visual content, write a keyword-rich title, and publish it to a relevant board. One action beats perfect planning.
Ready for more Pinterest strategies?
- How to grow your Pinterest followers
- AI Pinterest tool that saves me time
- Follow me on Pinterest for daily tips
Actionable advice for your digital / content / influencer / social media marketing.
Join 13,000+ smart professionals who subscribe to my regular updates.